
Hey everyone!
I re-organised my nail polish collection recently. Behold, the 340 polishes I own all swatched onto some fun colour wheels I bought from Amazon (pack of 10 for £1.50? Bar-gain!) It only took like... 2 weeks to do.


How is your collection organised? I'd love to hear more ideas, so drop me a comment below!
Until next time (which will be Monday!), have a great weekend!


I re-organised my nail polish collection recently. Behold, the 340 polishes I own all swatched onto some fun colour wheels I bought from Amazon (pack of 10 for £1.50? Bar-gain!) It only took like... 2 weeks to do.

While I was swatching them, I popped them all onto my polish list spreadsheet for you, complete with an extra sheet for ones I've thrown away and my gel polishes! Yay, organisation! The wheels are lettered and numbered on the back, with a dot and arrow on the front to let me know where number 1 is and in which direction it all goes.
My organisation attempt was to go with colour groups for each wheel. It didn't work perfectly, and I think this is one of the negatives of choosing wheels instead of the swatch sticks, which you can re-arrange. But for now at least, I don't mind. Except I don't have much space for any new polishes I may get (boo!).
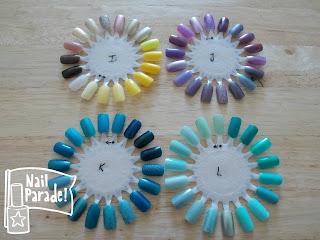
So, to begin with, I went with all of my warm colours, cycling (A-I) through the reds, pinks, lighter pinks, peachy/orange/corals, warm purples, true oranges, browns/nudes, and yellows/golds.


From J-S I went through the cool purples, teals, turquoise-y green-blues, true greens, dark blues/purples, brighter blues, silvers, black/very dark blues, paler/truer blues, and royal/true blues.


And so, whilst a part of me regrets choosing wheels over sticks (although sticks were a bit pricier, so whatevers), this was such a fun project, and I look forward to buying some swatch sticks to re-order everything and do it again some time within the next few months ;)
This also brought to my attention that I have a lot of blue polishes, and a surprising amount of pinks too. But they all look so pretty and I can't wait to try and wear them all- mission accepted!

Until next time (which will be Monday!), have a great weekend!
Comments
Post a Comment
I read and reply to every single comment, so make sure you leave one! (No verification needed)